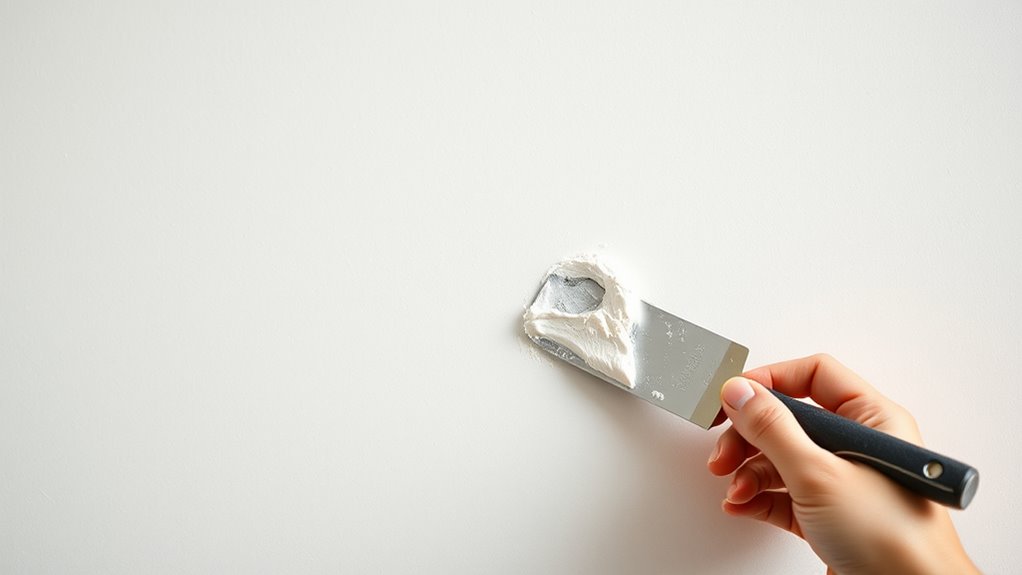

To start drywall repair, gather basic tools like a putty knife, drywall patch, and sandpaper. Clean and sand the area smooth, then apply joint compound using a taping or drywall knife, feathering the edges for a seamless look. For holes or cracks, choose the right patching material and match textures with spray or sponge techniques. Practice helps improve your skills, so keep exploring how to make your repairs almost invisible for a professional finish.
Key Takeaways
- Gather essential tools like joint compound, drywall patch, putty knife, sanding sponge, and primer before starting repairs.
- Clean and sand the damaged area to ensure proper adhesion and a smooth surface for patching.
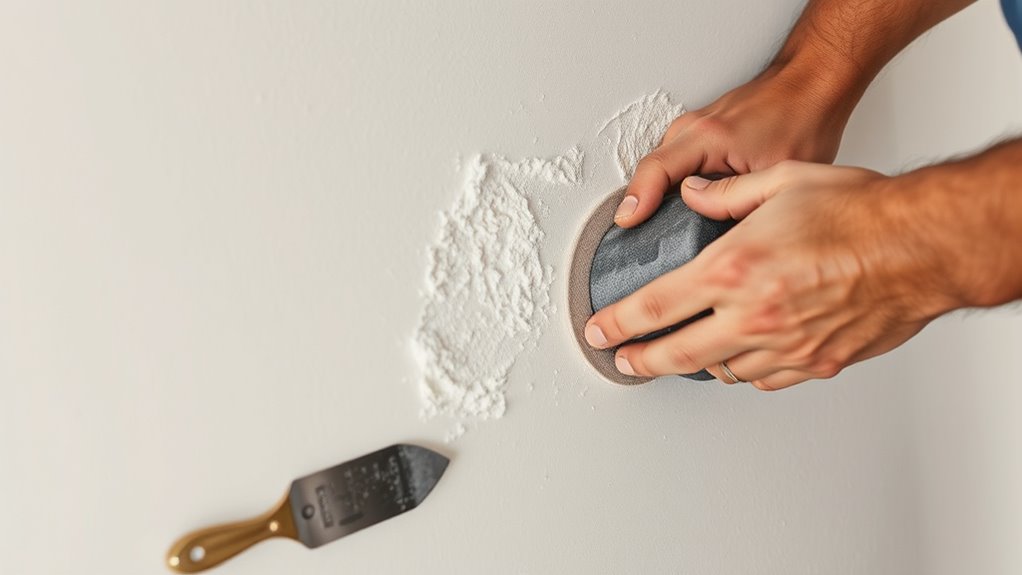
- Apply joint compound evenly with a putty knife, feathering the edges to blend seamlessly with the wall.
- Allow the compound to dry completely, then sand lightly to eliminate imperfections and prepare for painting.
- Match wall textures using spray, sponge, or trowel techniques to achieve a professional, invisible repair finish.
Are you tired of unsightly holes and cracks marring your walls? Repairing drywall might seem daunting at first, but with the right approach, you can restore your walls to look smooth and seamless. The first step is understanding how to match the texture of your existing wall, which is crucial for a professional finish. Texture matching involves observing the pattern and depth of the current surface—whether it’s smooth, orange peel, knockdown, or another finish. When you know what texture you need, you can choose the appropriate tools and techniques to replicate it. For example, if your wall has a subtle orange peel texture, you might use a spray gun or a sponge to mimic that pattern. For knockdown textures, a trowel or drywall knife can be used to flatten and blend the repaired area into the surrounding wall.
Tool selection plays a vital role in achieving a seamless repair. Start with the basics: a putty knife or drywall knife for applying joint compound and smoothing out patches. A sanding sponge or fine-grit sandpaper helps you feather the edges and create a smooth transition. If you’re working with larger holes, a drywall saw and a utility knife will help you cut clean, straight edges. For smaller cracks, a simple spackle knife might suffice. To blend textures effectively, you may need specialty tools like a texture sprayer or roller. These tools allow you to replicate the existing wall’s pattern more precisely, saving you time and effort. Choosing the right tools and techniques makes a significant difference in how well your repair blends into the original wall.
Before you start, verify you have all the necessary supplies: joint compound, patching material, primer, and paint. Proper tool selection makes the process smoother, but preparation is equally important. Clean the area thoroughly, remove loose debris, and sand down rough edges for better adhesion. When applying joint compound, use a taping knife or drywall knife to spread it evenly, feathering the edges to minimize visible lines. Once the compound dries, lightly sand the patch to smooth out any imperfections. If textures are involved, experiment with small sections first to perfect your technique before tackling the larger area. Matching the wall’s texture may take a few attempts, but patience and the right tools will help you achieve a nearly invisible repair. Additionally, exploring texture matching techniques can greatly improve your results and help you blend repairs seamlessly into your walls.
In the end, drywall repair for beginners isn’t just about fixing a hole—it’s about restoring your wall’s aesthetic cohesiveness. Focus on texture matching and tool selection, and take your time with each step. With practice, you’ll gain confidence, and your walls will look as good as new.
drywall patch kit
As an affiliate, we earn on qualifying purchases.
As an affiliate, we earn on qualifying purchases.
Frequently Asked Questions
How Do I Prevent Future Drywall Cracks?
To prevent future drywall cracks, focus on wall stabilization by controlling moisture and avoiding structural shifts. Use proper installation techniques, like securing drywall firmly and applying joint compound correctly. Keep an eye on temperature fluctuations and humidity levels, as they can cause expansion and contraction. Regularly inspect your walls for early signs of cracking and address issues promptly. These steps help minimize crack development and maintain a smooth, stable surface.
What Tools Are Essential for Drywall Repair?
When tackling drywall repair, you’ll need essential tools like a drywall saw to cut damaged areas precisely. A putty knife is vital for applying joint compound smoothly and evenly. You might also want a sanding sponge or paper for finishing touches. These tools help you patch holes and cracks effectively, ensuring a seamless repair. Having the right equipment makes your drywall repairs quicker and results look professional.
Can Drywall Be Repaired Without Sanding?
You can’t really dodge the fact that drywall repair usually requires some sanding to achieve a smooth finish, but you can minimize it. Using joint compound and drywall tape, you can fill and cover cracks or holes, then apply multiple thin coats. While some may think it’s a shortcut, a light sanding is often necessary to blend the patch seamlessly. Skipping sanding might leave visible imperfections, like a band-aid on your wall.
How Long Does Drywall Mud Take to Dry?
Drywall mud, or drywall joint compound, usually takes about 24 hours to dry completely, but drying time can vary based on factors like humidity and thickness of the application. You should check that the joint compound feels dry to touch before sanding or painting. To speed up drying, guarantee proper ventilation and apply thin coats. Patience is key to achieving a smooth, professional finish in your drywall repair.
Is It Necessary to Prime Before Painting?
Think of priming as giving your wall a fresh coat of confidence before painting. You don’t always need primer application, but it’s a smart step for paint preparation—especially on new drywall or if you’re changing colors dramatically. Primer helps the paint adhere better, smooths out surface imperfections, and prevents stains from bleeding through. Skipping it might save time, but priming guarantees a professional finish that lasts longer and looks flawless.
joint compound for drywall repair
As an affiliate, we earn on qualifying purchases.
As an affiliate, we earn on qualifying purchases.
Conclusion
Now that you’ve learned the ropes of drywall repair, you’re ready to turn rough patches into smooth sailing. Think of each repair as a small victory, a brushstroke in your home’s masterpiece. With patience and practice, you’ll build confidence like a sturdy wall—strong and reliable. So, grab your tools, embrace the process, and watch your space transform. Before you know it, drywall repair will feel as natural as breathing, leaving your walls flawless and your spirit triumphant.
drywall sanding sponge
As an affiliate, we earn on qualifying purchases.
As an affiliate, we earn on qualifying purchases.
texture spray gun for walls
As an affiliate, we earn on qualifying purchases.
As an affiliate, we earn on qualifying purchases.