To save your night deck photos, you should use manual settings with a low ISO (100-400) to reduce noise, and open your aperture wide (f/2.8 or lower) to let in more light. Use longer shutter speeds, possibly several seconds, while keeping your camera steady—either on a stable surface or with stabilization features. Experiment with lighting and white balance to avoid glare and reflections. Keep practicing these adjustments, and you’ll reveal even better night shots.
Key Takeaways
- Use manual camera settings with low ISO (100-400), wide aperture, and long shutter speeds to maximize light capture.
- Stabilize your camera on a sturdy surface or tripod to prevent motion blur during long exposures.
- Incorporate available artificial lighting or nearby streetlights to enhance scene visibility without overexposure.
- Take multiple shots at different exposures and review to select the best illuminated image.
- Fine-tune white balance and diffuse light sources to reduce glare and reflections for natural-looking results.
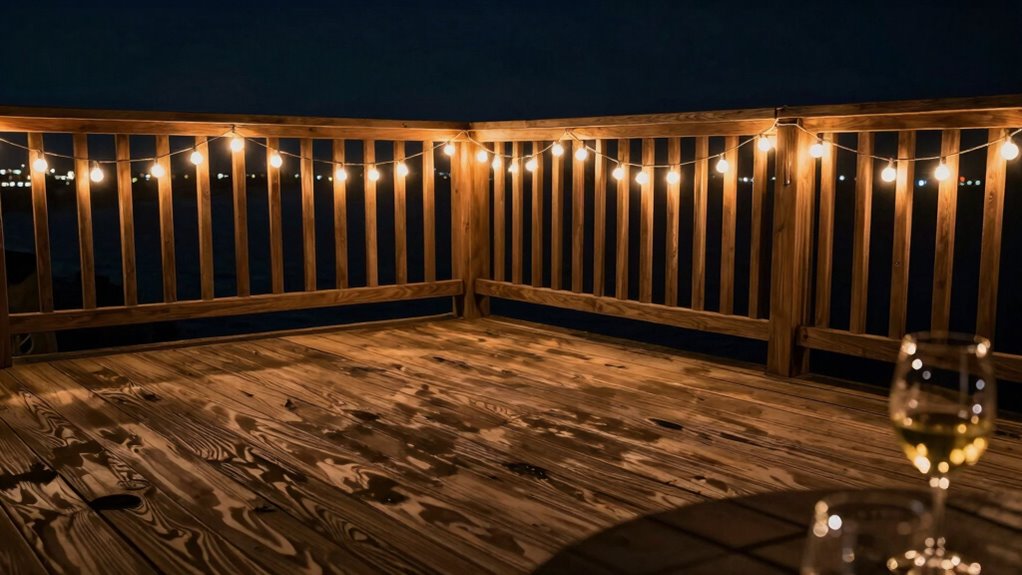
Capturing stunning night deck photos can be challenging, especially in low-light conditions, but with the right settings, you can achieve beautiful results. The key is understanding how to use artificial lighting to your advantage and guarantee your camera stays steady during the shot. Artificial lighting, such as deck lights or nearby streetlights, can provide the illumination you need without washing out the scene. Instead of relying solely on your camera’s auto settings, manually adjust your ISO, aperture, and shutter speed to optimize the available light. A lower ISO, around 100-400, helps reduce noise, while a wider aperture (f/2.8 or lower) allows more light into the lens. To compensate for limited natural light, you’ll need a longer exposure, so don’t hesitate to set your shutter speed to several seconds if your camera allows.
However, longer exposures come with their own challenge—camera shake. That’s where camera stabilization becomes essential. If you don’t have a tripod, use a sturdy surface like a table or railing to keep your camera steady. If you’re using a handheld shot, consider employing a camera with built-in stabilization or using a lens with optical image stabilization. This reduces blur caused by slight hand movements during long exposures. If possible, activate your camera’s stabilization feature, which can make a significant difference in sharpness. Using remote shutters or the timer function also prevents vibrations caused by pressing the shutter button. Additionally, understanding low-light photography techniques can greatly enhance your ability to capture clear images in such conditions. Being aware of your camera’s manual controls allows for more precise adjustments tailored to the scene’s lighting. It’s also helpful to familiarize yourself with exposure compensation settings to fine-tune your shots further. Learning about camera stabilization options available to your equipment can help prevent unwanted motion blur during long exposures.
Artificial lighting can dramatically enhance your night deck photos, but it’s important to control how it influences your scene. If the artificial light is too harsh, it can create unwanted glare or overly bright spots, so adjust your camera settings accordingly. Experiment with the white balance to match the color temperature of your lighting; this ensures the colors in your photos look natural. If you’re using multiple light sources, pay attention to shadows and reflections, adjusting angles or diffusing the light if necessary. Finally, take multiple shots at different exposures to ensure you get the best result. Review them on your camera’s screen or computer, and select the image that best captures the ambiance of your night deck scene. With patience and proper use of artificial lighting and camera stabilization, you’ll be surprised how much your night deck photos can improve. These techniques help you harness the low-light environment instead of fighting against it, turning what’s challenging into an opportunity for stunning, atmospheric images.
As an affiliate, we earn on qualifying purchases.
Frequently Asked Questions
Can Low-Light Settings Improve Photo Clarity on All Types of Decks?
Low-light settings can improve photo clarity on many decks, but success depends on proper deck maintenance and lighting placement. You should guarantee the deck is clean and free of obstructions, as debris can affect image quality. Additionally, strategically placing lights enhances visibility, reducing shadows and glare. By combining good maintenance with thoughtful lighting placement, you’ll capture clearer, brighter night deck photos that showcase your outdoor space beautifully.
What Camera Features Are Essential for Night Deck Photography?
For night deck photography, you need a camera with excellent low-light capabilities, like a wide aperture lens and high ISO settings. Use lighting techniques such as external lights or long exposures to brighten your shot. Camera stability is vital—use a tripod to prevent blur during long exposures. These features guarantee you capture clear, detailed images even in challenging low-light conditions.
How Does Weather Affect Low-Light Night Deck Photos?
Weather conditions profoundly impact your night deck photos. Rain, fog, or high humidity can create haze, reduce clarity, and introduce unwanted reflections, especially on wood or composite deck materials. Wind can cause camera shake or movement, blurring your shots. Clear, dry nights with minimal wind are ideal, helping you capture sharp, detailed images. Always consider the weather forecast and deck material to plan the best timing for your night photography.
Is a Tripod Necessary for Optimal Low-Light Night Deck Photos?
A tripod is vital for ideal low-light night deck photos because it guarantees tripod stability, preventing camera shake during long exposures. With a stable setup, you can maximize lens aperture, allowing more light to reach the sensor. This combination helps you capture clearer, sharper images in low-light conditions. Without a tripod, it’s challenging to maintain stability, resulting in blurry photos, especially when using slow shutter speeds necessary for night photography.
Can Smartphone Cameras Effectively Use Low-Light Settings for Night Decks?
Coincidences often surprise us, and in low-light photography, your smartphone can indeed effectively capture night decks with the right techniques. Using artificial lighting helps illuminate your scene, while maintaining camera stability prevents blurriness. You don’t always need a tripod; steady hands or placing your phone on a stable surface can suffice. Embrace these methods, and your night deck photos will turn out sharper and more vibrant.
Conclusion
As you harness this low-light setting, you open a new domain of night deck photography—one that transforms shadows into stories. But remember, every shot you take is a step into the unknown, revealing secrets hidden in darkness. Will you capture the perfect moment, or will the night keep its mysteries intact? The choice is yours, and the night whispers that some things are meant to remain unseen—until you dare to look closer.